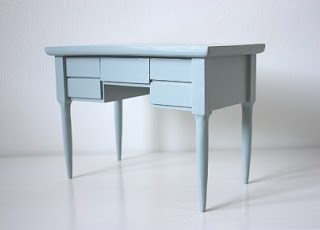
Unfortunately I have no pictures of the process of how I made the little drawers, but it was pretty much just measuring, sawing, sanding and gluing (thin veneer and wooden spatulas were used as a material). The drawers really works and they can be opened.
After lots of brainstorming, trials and errors the desk was up! The matchbox shows the scale:
Next I painted the whole thing with white furniture paint as a base colour.
Then I painted over the white with light grey which has a hint of green, something like Annie Sloan`s Duck Egg Blue. I didn`t have that colour ready and it was difficult to find that exactly right shade from ready mixed paints (and didn`t want to buy the Annie Sloan`s since they are so expensive!) so I had to mix it from some leftover white, grey and green paints from my earlier projects. I think the colour turned out well, although the picture shows it way too baby blue, which is far form the actual shade!
After the painting was done, started the distressing. First with rougher sandpaper and moving on to the finer until I was pleased with the result. Now you can see why I first painted the white under the grey paint:
Last it was time to make knobs for the drawers. My grandfather was a watchmaker when he was alive and I have saved lots of his stuff for cases like this and luckily, I found some nice little adjusting screws made of brass. The muted green-shaded-grey works extremely well with the brass knobs, don`t you think?
I added one more final touch by waxing the whole thing with beeswax creme. The finished size is : width 23,5 cm, depth 13,5 cm and height 17 cm.
OK, first goal achieved! Next I`ll probably make a matching chair to go with it. It could be something like this:
...but before that I have to build the frames of the whole diorama which I already have cut and painted. Just have to set them up, attach them together and do the flooring before I´ll continue with the furnishing and decorating.
Then I painted over the white with light grey which has a hint of green, something like Annie Sloan`s Duck Egg Blue. I didn`t have that colour ready and it was difficult to find that exactly right shade from ready mixed paints (and didn`t want to buy the Annie Sloan`s since they are so expensive!) so I had to mix it from some leftover white, grey and green paints from my earlier projects. I think the colour turned out well, although the picture shows it way too baby blue, which is far form the actual shade!
After the painting was done, started the distressing. First with rougher sandpaper and moving on to the finer until I was pleased with the result. Now you can see why I first painted the white under the grey paint:
Last it was time to make knobs for the drawers. My grandfather was a watchmaker when he was alive and I have saved lots of his stuff for cases like this and luckily, I found some nice little adjusting screws made of brass. The muted green-shaded-grey works extremely well with the brass knobs, don`t you think?
I added one more final touch by waxing the whole thing with beeswax creme. The finished size is : width 23,5 cm, depth 13,5 cm and height 17 cm.
OK, first goal achieved! Next I`ll probably make a matching chair to go with it. It could be something like this:
 |
| Picture from: boknas.fi |
...but before that I have to build the frames of the whole diorama which I already have cut and painted. Just have to set them up, attach them together and do the flooring before I´ll continue with the furnishing and decorating.


Just wow, I adore the cute desk. I wish I had similar at home - or two; in doll size and for myself, too! :D
ReplyDeleteWow that's really great work - I used to make 12th scale miniatures but haven't worked in MSD/SD size yet.
ReplyDeleteThanks SweetNeat! :)
ReplyDeleteRosie: My namesake! I used to work a lot with that scale too but then moved on to BJD`s. In a way the bigger scale is easier but on the other hand all the things just don`t work out the same way as they do with smaller ones. You should definitely try, it´s all worth it.