Showing posts with label Dioramas. Show all posts

2 Mar 2016

Project Diorama: the walls are up!

Today I finally got the diorama walls up! I have been waiting for this day for so long. Of course I could´ve got it done sooner but then again, what´s the rush anyway. I like to concentrate on small details and making things as pretty as possible.

Notice here the table on which it is placed. I have been doing some furniture changes in my flat and the oak cupboard was moved to the other side of the room. This little table is more suitable for the diorama because it is much lower than the cupboard and thus easier to display and above all - to see and more closely to look the set.


Here is Lyra and her desk to give you the idea of the proportions and scale:


...and some details:


The corner supporters will be painted to blend in the outside wall and all the raw edges will be getting moldings to finish the look, but boy I am happy. That´s it for now. I have plenty of things to show you guys, so stay tuned for updates.

22 Jan 2016

Project Diorama: Walls are soon finished

My diorama has progressed very much since the last time I posted anything about it. I have been in a crafting frenzy lately and been doing almost only the diorama during my "crazy mood". I have been in a constant flow so I´ve had no time to take any pictures with my SLR camera, but instead took some snapshots with my phone and posting them on my Instagram account. I put all the pictures here for you to see what I´ve been up to:

I made frames for the windows from wood and created a faux stone effect using egg cartons.
The gaps I filled with  grout (the whitest lines on right).

The second window frame made the same as the first one,
only this time I finished it before gluing it on the wall.

To create aged and plastered look to the outside wall,
I glued a thick creased paper which I had dyed with coffee.

I then highlighted the creases with white and grey pain to make it look uneven and old.
I wanted to make a stone foundation, also made from egg cartons with grout filled gaps.
Afterwards I painted the white grout as light grey, but I have no picture of that yet.

When the outside was pretty much done, it was time to move on to the inside wall.
First some moss green and grey paint, then a home-made crackle paint
before adding the final layer of white on top of it.
The dark paints peek through under the white from the exposed cracks.

This is how it turned out. The crackled surface is quite cool!
Not sure will I leave it like that or will I add some other colour as well, though.

Goodbye dark brown frames, welcome whiteness!
Ignore the ugly bathroom scene, but that was the best place to do the sanding and painting.

The flooring which I had made earlier got also some aging on it.
Just highlighted corner parts of each square a bit to make it look more three dimensional.
On the middle you can see the parting between the enhanced (left) and the untouched (right) surfaces.

Ready!
The little touch-up made much more depth to it.

Finally tested the whole construction together.
Sorry for the strange angle of the picture but it was super difficult to balance on a kitchen stool
while holding the walls up and taking a pic.

This is as far as I have got for now. One of the trickiest part is still to come, the window that is. I would like to get a real glass on it but I´m afraid it will be very difficult to find in a correct size. Of course I could go and get that piece of glass cut to size in some place but I bet it would cost a fortune. Maybe I have to settle on a plexiglass instead of a real one. But we`ll see.

28 Nov 2015

Project Diorama: Change of plans

One day while walking home from a market, I found two glass doors leaning on a dumpster. There was no way I could´ve left them there and I grabbed them with me. The decorations are beautiful and perfect style for the greenhouse study. I tried it with the flooring and it looks even better than the previous window I had there and as a bonus, this new one is much lighter to handle and it is exactly as tall as the white one was. Wow what a coincidence! The only con is that it is narrower than the flooring so I have to add there a lengthening piece. I will paint it white and distress it a bit.


The other wall is also progressed with cutting on the upper corner and window opening, which is raw at the moment and waiting to be finished with Dremel. However, I have to straighten the upper arch of the window opening just for the reason that it´s easier to make the glass and the framing with straight lines than curved.

6 Oct 2015

Project Diorama: the flooring

The diorama is slowly progressing. After considering different flooring options from real mosaic, faux tiling made from egg cartons, painting marbling effects, etc. I decided to go the easy way and chose to checker the whole area with matt white and glossy grey paint. It was easy yes, but turned out very time consuming while painting the squares even (and my perfectionism didn`t help either, lol!).

First I drew the lines, then I covered half of them with tape to make the checkering.

This is how it turned out.

I am pleased with the result. At first I was a bit skeptical about whether it would look cheap or too flat, but gladly it created a nice texture on the surface since the paints I used were quite thick. When the whole set is finished, I will batten the raw edges from both the floor and the wall so that they will be much neater.

22 Sept 2015

Project Diorama: first furniture

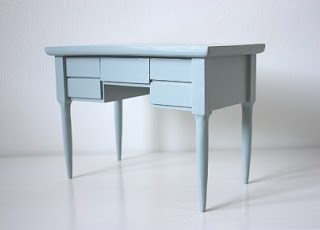
During the summer I started making the first and the most important thing for the diorama, which is an old writing desk. Of course a proper botanist has to have her own desk to keep all the important notes and writings in order, so I searched pictures of different desks and styles I liked and made a plan using Ana Whites tutorial. I had a lots of materials already on store so I didn`t have to buy anything. Here is a picture from the start:


As a tabletop I used a piece of veneer I found from trash and the pieces below are the sides and the back of the desk. Originally the legs were not wood carved but straight sticks which I shaped with Dremel to look like that. I also drilled holes on both to the legs and the tabletop, glued some barbeque sticks to the legs and with mortise joint attached the legs under the top. After the glue was dried I cut off the excess lenght of the sticks and sanded the area.
Unfortunately I have no pictures of the process of how I made the little drawers, but it was pretty much just measuring, sawing, sanding and gluing (thin veneer and wooden spatulas were used as a material). The drawers really works and they can be opened.

After lots of brainstorming, trials and errors the desk was up! The matchbox shows the scale:


Next I painted the whole thing with white furniture paint as a base colour.


Then I painted over the white with light grey which has a hint of green, something like Annie Sloan`s Duck Egg Blue. I didn`t have that colour ready and it was difficult to find that exactly right shade from ready mixed paints (and didn`t want to buy the Annie Sloan`s since they are so expensive!) so I had to mix it from some leftover white, grey and green paints from my earlier projects. I think the colour turned out well, although the picture shows it way too baby blue, which is far form the actual shade!


After the painting was done, started the distressing. First with rougher sandpaper and moving on to the finer until I was pleased with the result. Now you can see why I first painted the white under the grey paint:


Last it was time to make knobs for the drawers. My grandfather was a watchmaker when he was alive and I have saved lots of his stuff for cases like this and luckily, I found some nice little adjusting screws made of brass. The muted green-shaded-grey works extremely well with the brass knobs, don`t you think?


I added one more final touch by waxing the whole thing with beeswax creme. The finished size is : width 23,5 cm, depth 13,5 cm and height 17 cm.


OK, first goal achieved! Next I`ll probably make a matching chair to go with it. It could be something like this:

Picture from: boknas.fi

...but before that I have to build the frames of the whole diorama which I already have cut and painted. Just have to set them up, attach them together and do the flooring before I´ll continue with the furnishing and decorating.

17 Sept 2015

Project Diorama starts now!

For a long time have I dreamed of building a diorama for my girls. The difficulty has been the size: Nekome is SD, Stella MSD, Mimi petite and the newest member Lyra is tiny. It´s impossible to create a set where each doll would look good and on scale, so, I decided to build only one diorama for one doll and arrange a nice shelf into my glass cabinet for the others. Since I have so inspiring background story for Lyra - and because she is the smallest human doll in size - I chose to build the set to match her world.

To tell you a little bit about Lyras background, she is a biologist, more closely a botanist. Her parents were biologists too and from them, she got the spark for natural history and science. The study stands on an old conservatory/ geenhouse, filled with old bottles with specimens inside them, plants and curiosities. The colour scheme is shabby chic, muted pastels and earthy tones. I haven`t determined the exact year of where the story takes place but perhaps something like 1920`s or so on. I am not very strict about the years but one thing I am: the scale of the diorama must be correct! (or at least as correct as possible)
Yeah, not letting myself easy on this, am I?

The free space was difficult to find due the size of the whole diorama but after looking, pondering and measuring I found a decent place to set it. In an ideal situation I´d have a whole room just for dolls but since that is not possible, I decided to make it on the top of my old oak drawer. It is a tad high for the purpose but otherwise works really well.


From the picture above, you can see an old window on the top of the drawer. That will be playing an important part for the whole set: it will be one of the diorama`s wall. I made a simple illustration of the construction to give a better picture of how it will look:


The floor and the left wall will be solid and the whole structure will be held together with angle irons. The left wall will get a window too but haven`t decided the shape and size yet. For the flooring on the other hand, I have been thinking of making some kind of tiling. Something resembling of worn-out bricks like you see in the real-life conservatories or maybe slate. Should the colour be terracotta, light sand, black slate or - my all time favourite - black & white like chess board? Oh, so many things to decide!

But anyways, that`s everything for now. Stay tuned for more to come!