22 Sept 2015

Project Diorama: first furniture

During the summer I started making the first and the most important thing for the diorama, which is an old writing desk. Of course a proper botanist has to have her own desk to keep all the important notes and writings in order, so I searched pictures of different desks and styles I liked and made a plan using Ana Whites tutorial. I had a lots of materials already on store so I didn`t have to buy anything. Here is a picture from the start:


As a tabletop I used a piece of veneer I found from trash and the pieces below are the sides and the back of the desk. Originally the legs were not wood carved but straight sticks which I shaped with Dremel to look like that. I also drilled holes on both to the legs and the tabletop, glued some barbeque sticks to the legs and with mortise joint attached the legs under the top. After the glue was dried I cut off the excess lenght of the sticks and sanded the area.
Unfortunately I have no pictures of the process of how I made the little drawers, but it was pretty much just measuring, sawing, sanding and gluing (thin veneer and wooden spatulas were used as a material). The drawers really works and they can be opened.

After lots of brainstorming, trials and errors the desk was up! The matchbox shows the scale:


Next I painted the whole thing with white furniture paint as a base colour.


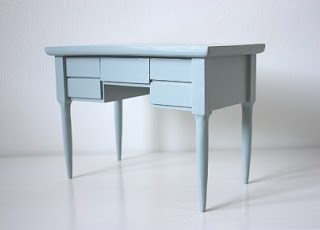
Then I painted over the white with light grey which has a hint of green, something like Annie Sloan`s Duck Egg Blue. I didn`t have that colour ready and it was difficult to find that exactly right shade from ready mixed paints (and didn`t want to buy the Annie Sloan`s since they are so expensive!) so I had to mix it from some leftover white, grey and green paints from my earlier projects. I think the colour turned out well, although the picture shows it way too baby blue, which is far form the actual shade!


After the painting was done, started the distressing. First with rougher sandpaper and moving on to the finer until I was pleased with the result. Now you can see why I first painted the white under the grey paint:


Last it was time to make knobs for the drawers. My grandfather was a watchmaker when he was alive and I have saved lots of his stuff for cases like this and luckily, I found some nice little adjusting screws made of brass. The muted green-shaded-grey works extremely well with the brass knobs, don`t you think?


I added one more final touch by waxing the whole thing with beeswax creme. The finished size is : width 23,5 cm, depth 13,5 cm and height 17 cm.


OK, first goal achieved! Next I`ll probably make a matching chair to go with it. It could be something like this:

Picture from: boknas.fi

...but before that I have to build the frames of the whole diorama which I already have cut and painted. Just have to set them up, attach them together and do the flooring before I´ll continue with the furnishing and decorating.

17 Sept 2015

Project Diorama starts now!

For a long time have I dreamed of building a diorama for my girls. The difficulty has been the size: Nekome is SD, Stella MSD, Mimi petite and the newest member Lyra is tiny. It´s impossible to create a set where each doll would look good and on scale, so, I decided to build only one diorama for one doll and arrange a nice shelf into my glass cabinet for the others. Since I have so inspiring background story for Lyra - and because she is the smallest human doll in size - I chose to build the set to match her world.

To tell you a little bit about Lyras background, she is a biologist, more closely a botanist. Her parents were biologists too and from them, she got the spark for natural history and science. The study stands on an old conservatory/ geenhouse, filled with old bottles with specimens inside them, plants and curiosities. The colour scheme is shabby chic, muted pastels and earthy tones. I haven`t determined the exact year of where the story takes place but perhaps something like 1920`s or so on. I am not very strict about the years but one thing I am: the scale of the diorama must be correct! (or at least as correct as possible)
Yeah, not letting myself easy on this, am I?

The free space was difficult to find due the size of the whole diorama but after looking, pondering and measuring I found a decent place to set it. In an ideal situation I´d have a whole room just for dolls but since that is not possible, I decided to make it on the top of my old oak drawer. It is a tad high for the purpose but otherwise works really well.


From the picture above, you can see an old window on the top of the drawer. That will be playing an important part for the whole set: it will be one of the diorama`s wall. I made a simple illustration of the construction to give a better picture of how it will look:


The floor and the left wall will be solid and the whole structure will be held together with angle irons. The left wall will get a window too but haven`t decided the shape and size yet. For the flooring on the other hand, I have been thinking of making some kind of tiling. Something resembling of worn-out bricks like you see in the real-life conservatories or maybe slate. Should the colour be terracotta, light sand, black slate or - my all time favourite - black & white like chess board? Oh, so many things to decide!

But anyways, that`s everything for now. Stay tuned for more to come!

15 Sept 2015

The newest addition to my family - a box opening!

Hello,
long time no updates but finally I had some time to take some photos and write a bit.

So, I have a new doll! She is Nena02 Reira from Atelier Momoni, which I preordered on May. The doll came in the beginning of August. I am super impressed with the quality of the resin: the doll has no seams of any kind and the surface is incredibly smooth. Now I really understand why so many people love dolls from small artist and what the difference can be when compared to bigger companies.

But let`s get on to the pictures:


Pink cushion!


Isn`t she beautiful! This is actually my first doll to whom I created a proper background story before I even had her. You can read more about her from her page. My other dolls didn`t have any and I bought them just because they were beautiful and I found them appealing and started to create their stories only afterwards. But this girls is totally different in many ways! First of all, she is - like already mentioned - from a small artist, from EU instead of Asia and she is smaller than my other girls (hight 35 cm). At first I wasn`t sure about the size since I like my Minifee and MSD`s in general, but when I asked about that from Lola (the artist herself), I realized she isn`t that much smaller than Minifee so I decided to go for it. And indeed I do not mind at all that she is a tad smaller. As a matter of fact it is good thing because I am planning a diorama for her and if she was bigger, I`d need more space to build it.

So what`s her name then? Ladies and gentlemen, let me introduce you to Lyra Verna Willowfern.

Sorry for the wonky eyes!
It took a while to set them right and still I failed. 


Of course the first thing to do was her faceup and bodyblushing. I am pleased how well I succeed with the result since she is so small, but I am not sure about her lips though. For my surprise, the lips were the most difficult to do this time, despite that they usually haven`t been the hardest part in my previous faceups.

The eyes are wonderful Enchanted Doll Eyes Milky no. 41 in 12 mm, but unfortunately as you can see, they are too big and seem to sink deep inside her head. Definitely not the effect I want! The ED eyes has very strong dept and for that reason, if the doll has relatively small eye opening, they tent to look just dark/ black. See what I mean:

ED`s depth makes the doll look black-eyed if the eye size isn`t right.

Lola (the artist herself) has also noticed the same but ED´s 10 mm eyes are perfect. Most of the other eye brands 12 mm size fits well but if you want ED´s, choose one size smaller. I have already placed an order for new eyes and the wig is also chosen but I´ll show them both together later.

Well, that`s about it for today. I have some very exciting projects to how you soon!