25 Feb 2016

I have been infected

Sorry guys for my long silence. I have been much more active on Instagram mainly because it´s so much easier to post quick pics there than on Blogger. If you are keen to see things quicker than what I post here on Blogger, I suggest you to head on to the IG.

First of all, I have a new doll!
I have been infected by the Blythe fever that´s going on amongst the doll people. It´s funny that a few while ago I absolutely disliked Blythes because of their super disproportionate body. The head is humongous and at first the dolls seemed grotesque to me. They have this eye mechanism which allows them to change gaze when pulled from a string from the back of their heads. The mechanism was intimidating as I watched some customizing videos from Youtube where the head was opened and the whole thing was revealed. But you know, when I started to see videos, photos and other postings of them, I slowly started to like them, especially the customized ones. And there I was, ordering my first!
The things that really appeals to me with these dolls are first of all the price. You can find a factory Blythe (no clothes, just plain doll with hair and make up) as low price as 40 $, so way much cheaper than BJD´s. They are more durable than resin dolls because Blythes were originally made as children´s toys so they had to be made to last also a bit rougher plays. You can customize them in a million ways just like BJD´s from changing eye chips, making or buying wigs, rooting hair by your self, carving and painting face, etc. They are small enough to carry where ever you please for photo shoots, and if you happen to brake something, you can buy replacement parts cheaply and easily from many various web shops.

As much as I love my resin BJD´s, they are fragile, heavy and expensive and therefore not something I want to ruin by carrying here and there in public. I wanted to have a small, cheap doll which I could take with me for example on a weekend trip and take funny snap shots of it doing everyday things. The big head and eyes also allows them to have lots of character regardless the small size (a bit like a caricature drawings have).

So I went and chose my first Blythe girl with long golden brown hair. I originally wanted to have short haired doll, but since there wasn´t the colour I wished, I decided to go with long and cut it to short afterwards (there was no differences in the prices regardless of the hair lenght).

The box with the always-so-funny text!

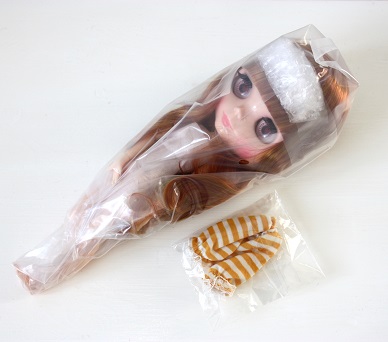
Here she is wrapped in plastic.
I also purchased a pair of little bloomers to go with her.

As soosn as I took her out from the plastics, I noticed the legs had been bended during the shipping so badly that she was not able to stand straight at all. This picture does not show how wonky they actually were, but you still get some idea of the issue:

But alas she had a shipping injury: bended legs!

I contacted the seller and she kindly promised to send me a new body to replace the broken one.

After couple of weeks the new body arrived in a perfect condition.

Then started the customizing. First was the most difficult part, aka "destruction", which means taking the whole doll apart. Blythe´s have many small different parts inside their heads because of the eye mechanism. I honestly was super nervous to start this phase! After watching numerous Youtube videos and reading tutorials about the process I had gained enough courage to begin. After all everything went well and I didn´t brake anything. Here you can see pictures of the process (sorry for the quality in some of the pictures! They were taken with my phone for Instagram):


Both Sides of the head and the eyelids got sanded matt. I carved her lips, philtrum and nose just a bit to enhance her sweet features:


I wanted to paint my own eye chips so the plastic ones had to be taken off:


I ordered the new chips from a wonderful Cool Cat web shop. I chose the glass ones because I love the crystal clear look and the quality of them. Only the best for my girl! ;)


I tried several methods, colours and paints on the glass chips to get the idea what works the best. From top to bottom: first-, second- and the third pair painted with the same method. The bottom pair was the fourth and those have been painted using different method (the pupils are still unpainted):


After many trial and error, these were the first pair which I was happy with both colour and texture wise:


When the right method and colours were decided, it was time to paint the other two sets:

Waiting for the paint to dry.

I painted the fourth eye pair in mint green colour:


Newly painted eye chips glued on the eyeballs and the whole mechanism has been inserted back inside the head. The scalp is partly attached too:


And finally, here she is put back together again:


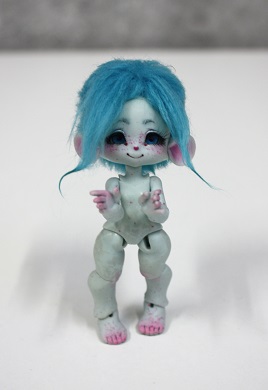
What came to the faceup, I wanted her to look natural and simple. For some reason Blythe´s usually don´t have any eyebrows, which I found a bit weird, and for that reason I gave my girl a pair. I like how she turned out, but I must say that this will be the first and the last Blythe I´m going to own. I absolutely love her but for me there is too much little nibs and nobs to deal with and too many parts to brake or loose. I enjoy the result I managed to achieve but to be honest, I did not enjoy the process at all. I was simply too afraid to brake something or generally do something wrong! Compared to Blythe´s, resin BJD´s are so easy to handle and above all, change eyes. And because I find myself to be less is more -kind of a person, owning too many dolls is the deal braker to me. I want to have just a small collection.

My Blythe still needs some hair styling and cutting, and I haven´t even decided her name yet but all that will come sooner or later. Right now I will enjoy her like this while spending time with her to get to know who she really is.

Posing in her new outfit.

22 Jan 2016

Project Diorama: Walls are soon finished

My diorama has progressed very much since the last time I posted anything about it. I have been in a crafting frenzy lately and been doing almost only the diorama during my "crazy mood". I have been in a constant flow so I´ve had no time to take any pictures with my SLR camera, but instead took some snapshots with my phone and posting them on my Instagram account. I put all the pictures here for you to see what I´ve been up to:

I made frames for the windows from wood and created a faux stone effect using egg cartons.
The gaps I filled with  grout (the whitest lines on right).

The second window frame made the same as the first one,
only this time I finished it before gluing it on the wall.

To create aged and plastered look to the outside wall,
I glued a thick creased paper which I had dyed with coffee.

I then highlighted the creases with white and grey pain to make it look uneven and old.
I wanted to make a stone foundation, also made from egg cartons with grout filled gaps.
Afterwards I painted the white grout as light grey, but I have no picture of that yet.

When the outside was pretty much done, it was time to move on to the inside wall.
First some moss green and grey paint, then a home-made crackle paint
before adding the final layer of white on top of it.
The dark paints peek through under the white from the exposed cracks.

This is how it turned out. The crackled surface is quite cool!
Not sure will I leave it like that or will I add some other colour as well, though.

Goodbye dark brown frames, welcome whiteness!
Ignore the ugly bathroom scene, but that was the best place to do the sanding and painting.

The flooring which I had made earlier got also some aging on it.
Just highlighted corner parts of each square a bit to make it look more three dimensional.
On the middle you can see the parting between the enhanced (left) and the untouched (right) surfaces.

Ready!
The little touch-up made much more depth to it.

Finally tested the whole construction together.
Sorry for the strange angle of the picture but it was super difficult to balance on a kitchen stool
while holding the walls up and taking a pic.

This is as far as I have got for now. One of the trickiest part is still to come, the window that is. I would like to get a real glass on it but I´m afraid it will be very difficult to find in a correct size. Of course I could go and get that piece of glass cut to size in some place but I bet it would cost a fortune. Maybe I have to settle on a plexiglass instead of a real one. But we`ll see.

5 Jan 2016

A new year and some dolly thoughts

Picture: morguefile.com

Christmas was and went, the year 2015 has turned into 2016 and I´ve not updated anything since our little Christmas dolly meeting. Time goes by so fast! Of course I was going to do a Christmas photoshoot, but something always came and interrupted my plans, so - no pictures. Also sadly the darkness, the rain and the lack of snow stole my entire Christmas spirit away anyway. I had a nice time, but something was definitely missing. :/

Anyhow since it is a whole new year now, I want to wrap the old up and tell about my future plans.
The year 2015 was my first doll year after my 5 year brake within this hobby. I was very surprised how hard the excitement and inspiration hit me again after such a long time!

Things I achieved:
* I bought two dolls and sold one.
* I started making the diorama + crafted little things in it.
* Purchased new clothes and shoes.
* Commissioned a clothing set for Lyra from Etsy (still under making).
* Purchased doll stands for all of my bigger dolls (review coming soon).
* Made my first faceups for others than my own dolls and did my first customisations/ repairs for a BJD (more about those later on!).
* Made many new doll friends and participated on several meetings.
* Purchased a light tent for photographing. It´s been on my wish list ever since I purchased my first digital camera back in 2010. The tent has been ordered and still on delivery, but hopefully coming soon.

My future plans for the year 2016 are:
* To continue and finish the diorama.
* Learn to take better photos and generally be more active on that area.
* Purchase a doll I´ve been drooling (still on the desk of the doll artist, but according to her, soon to be ready for a perorder!).
* Get to know my only SD girl better and create her more complete personality.

...And the biggest plan of the year is:

* To participate the Ldoll festival on Lyon, France.
Nothing is certain yet but I would really, really like to go there. I have never visited any BJD convention before and it makes it even more tempting that it´s inside EU and not too far away from Finland either. I wouln´t dare to travel alone but we have already had some discussions about going there as a group with some doll people on Facebook. Let´s see how the things turn out.

Overall I´d say 2015 was a pretty good and productive year. The new plans are pretty exciting too and I hope you all will have just as exciting times ahead as I do.

Some unfinished things waiting for inspiration

16 Dec 2015

Package from Russia


On November I made an order on Etsy shop called CaramelBJDcom. They sell doll socks and clothing with awesome prints and they had a 1st year anniversary sale coming up. I had been admiring their items for a while and when I heard about the birthday sale, I had to take advantage of that.

I purchased three pairs of socks for Lyra, four pairs for Stella and also jeans and a shirt for her. All of the items were pre-order stuff so I had to wait for a while for them to be made. The shipping took a bit longer of what I was expecting but never the less, everything was fine once it came. All of the clothes were packed nicely and nothing was missing. The quality is wonderful! Let´s see what I got:

The items were well organized and labelled correctly.


And here´s Stella modelling the clothes:

Darn she looks cute!
Notice the new purple shoes how well they suit with the outfit.

There is just one word to describe the shirt: kawaii! The jeans are absolutely perfect and so well made. The fitting is snug with no loose waistband, just like a well tailored jeans should. There are little working pockets on the back side:


Then the socks, first Stella´s:

From left: Vanilla Bouquet, Gzhel, Blue and Pink, Caramel

...and then Lyra´s:

From left: Autumn Evening, Dead Head (there´s a deer skull on the knee), Mechanical Romance
All of the sock fits with no complaining and look good. Some of the pictures on their shop are a bit lighter or darker of what the products actually are but nothing so drastic that you´d be disappointed. Overall the colours are very vivid. My experience of this Etsy seller is nothing but very positive and will definitely buy more from their shop also in the future. I highly recommend!

14 Dec 2015

Little Christmas doll meet!

We had a Little Christmas meeting on Saturday 12th December. Lots of people, lots of dolls, lots of talking and nice time. For the first time ever I had a chance to meet Xaya from A Little Book of Bluefairies and see some of her lovely dolls. Enjoy the pictures!

Dust Of Dolls: Appi

Azone

Enaibi dolls tiny, tiny mouse.
She was only about 7 cm tall!

Frodo

Soom Mirabil

Bluefairy Tinyfairy May Valentine with Soom goat legs


Minifee Karsh as Legolas

Minifee Mio, Azone and Piposdoll cat

My girls Stella and Lyra!
(Minifee Ryeon and Atelier Momoni Nena02, Reira)

Bluefairy Tinyfairy Patric.
He was just like the Joxter from Moomins!


Luts Centaur

Volks Lorina

Unoa girls

Xaya´s Bluefairy Pocketfairy girl and Cocoondolls tiny Hilla

Xaya´s Bluefairy Tinyfiary girl